As the Team Photographer for the Minnesota Thunder (USL - First Division Team) and their Women’s Team, the Minnesota Lightning, I get to shoot about 25 high level games each season. In addition I typically shoot a few of the US Men’s National Team Games. I also spent last September in China with the US Women’s National Team at the FIFA World Cup, shooting for our book Portrait of Passion.
Bringing it down to a more practical level, there are over 80,000 kids registered with the Minnesota Youth Soccer Association. Doing the math, there are an almost unimaginable number of parents out shooting photos of their kids each week. Let’s guess that about one quarter of the kids have parents who are shooting 20 photos each week – hmmm that works about to be about 400,000 photos each week in Minnesota! Good thing all those photons are free!
There are lots of reasons that soccer parents have difficulty getting a good soccer photos, first of which is that Soccer Photography is HARD! Youth soccer is especially hard since the movement of the ball is fairly unpredictable and if you are trying to shoot the player with the ball, there are 19 others, not counting the goalies, who are trying to get in the way of your shot.
Here are some of the most common problems and some simple solutions that are guaranteed, well almost guaranteed, to improve your soccer photos!
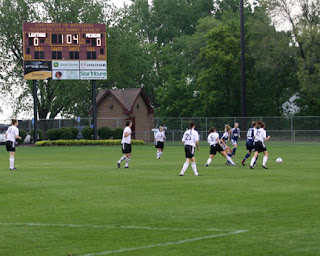
Problem #1 - The image of the players is just a speck on the photo! Lots of field, not much detail of the action –
Recommendation - Mentally divide the field into quadrants and only shoot when the players are in your quadrant of the field. Just be patient, the shot will come to you!
Problem #2 - The image of shows the players, but not much of the action –
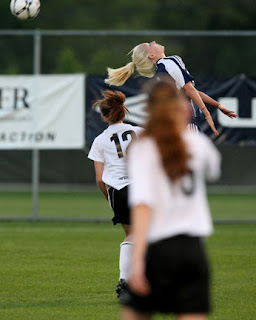
Recommendation – Again be patient! Only shoot when the players are coming at you. In doing this you will capture the expressions and the intensity of the game. If you are shooting a game where the players have reasonably good skills, one of the prime spots to sit is at the end line. As the forwards and midfielders are moving the ball do the goal, there are often great opportunities to get some head on shots! If you are trying to get goalie shots or defenders, somewhere between the top of the goalie box and midfield works really well.
Problem #3 – My photos are blurry!
(shot at 1/200th - f4.5)
Recommendation - The image stabilization technology that is being built into many new cameras and most high quality lens is really terrific; having said that, there is nothing that can replace a high shutter speed for stopping action and getting a clean crisp photo. The general rule of thumb on the minimum shutter speed that you should use to handhold a tele-photo lens is the reciprocal of the focal length. In other words, if you are shooting with a 200mm lens, your minimum shutter speed should be 1/200th of a second. And yes, image stabilization technology does reduce that.
1/200th of a second is not sufficient to stop action in soccer. Even at a youth level, I suggest no less that 1/400th and as the age of the players and speed and their skills increase, so must the shutter speed.
All of this means that you will have to shoot with your camera set on Shutter Priority. For those who are accustomed to shooting in a program mode, you will need to change the Mode setting on your camera from P to TV (on Canon) or S (on Nikon).
What you may notice, particularly if you are shooting in the evening, is that your images are appearing too dark. Increase your ISO setting to the highest practical level. This will vary greatly depending both on the camera model that you own, as well as the age of the camera. Some of the newer cameras from both Canon and Nikon, have extremely high ISO ranges, but some of the older models are more limited. For example, my older Canon 1D can be set to 1600 ISO, but has a fair amount of noise at that level, my new Canon 1D Mark III can shoot at 6400 ISO and give a fairly clean image. The new Nikon D3 has an amazing 25,600 ISO!!
(Shot at 1/400th - f 4.5)
If you are shooting a night game with poor field lighting (which is pretty typical at anything lower than a professional level), you may find that you only have three alternatives:
- Lower shutter speed which will probably give you a blurry image;
- Higher shutter speed which may not provide sufficient light; or
- Put your camera away until you can get close enough to take a celebratory team photo after the game using your flash.
I hope that my recommendations are helpful to you and that you will indeed get a few great soccer shots. As the season goes on, I will add to this topic and include things like shooting a great team photo, lens length selection, working with two cameras, the three shooting zones, and workflow.
In the meantime - have fun, after all, that is what is all about! Check out our Competitive Image website, if you get a chance!


4 comments:
Wow-
those are some amazing shots.
I love it. I am inspired to take some great shots tonight at soccer and baseball!
I love the comment about you never seeing the bad shots. That is so important in soccer photography and other sports photography because it is so easy to take so many photos you distract from the good ones. I have some additional ideas on my blog that will compliment these ideas if you check out: http://sportsphotographysuccess.com/blog/
Scott Wells
thank you for the tips. I love shooting my daughter's soccer games. My oldest is now a sophmore in high school and one of the problems I discovered that shooting the evening games was nearly impossible, so I've been perusing the internet for tips. I so wish I could afford one of those amazing zooms with an f/2.8, but yikes!!
I just purchased a Nikon D7000 so I'm hoping that might help a bit since the iso goes higher than my old camera. My zoom is a 70-300 but is only an F/4-5.6.
Post a Comment